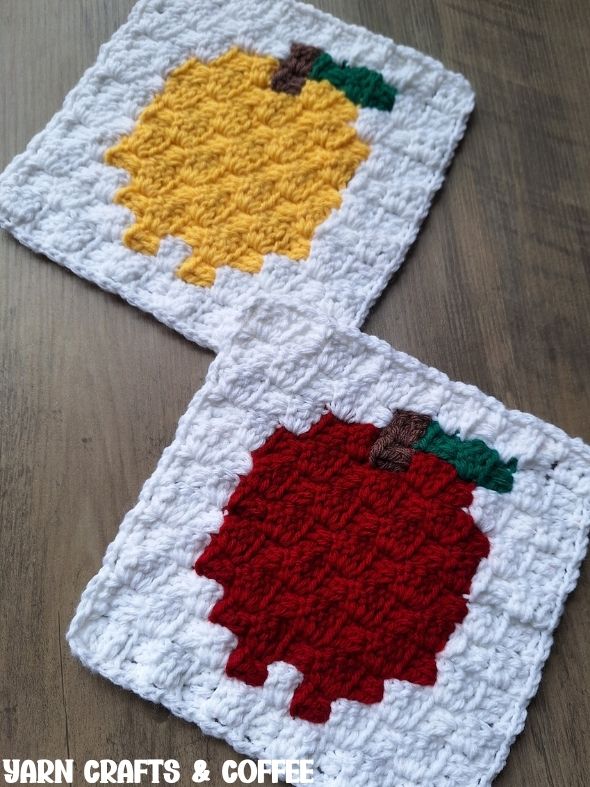
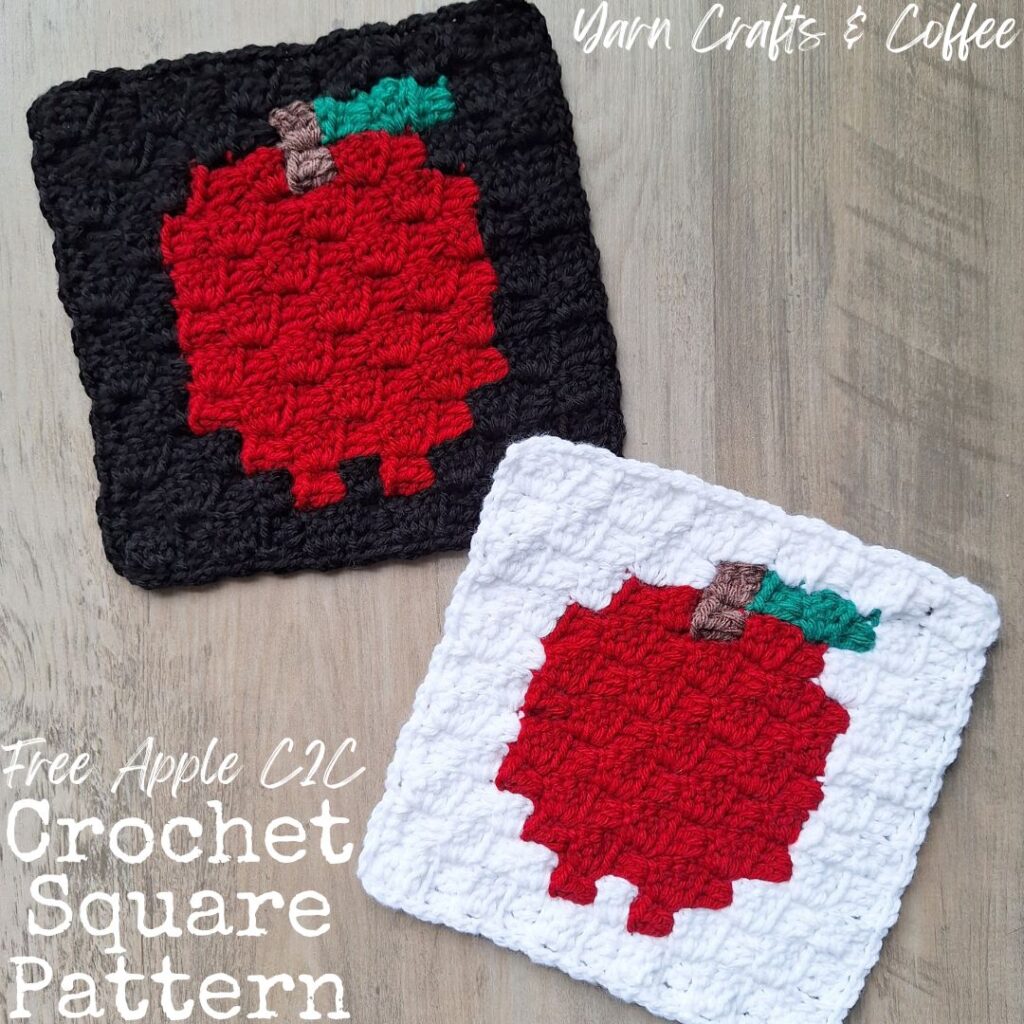
Learn how to crochet a c2c square, or corner to corner square, of an apple that you can use as a washcloth or wall hanging on it’s own, or sew a bunch together to make a bigger project, like a cozy blanket for Fall.
Find the free crochet pattern instructions below, or purchase a printer-friendly, ad-free PDF on Ravelry by clicking here.
In a hurry? Pin this for later when you have more time.
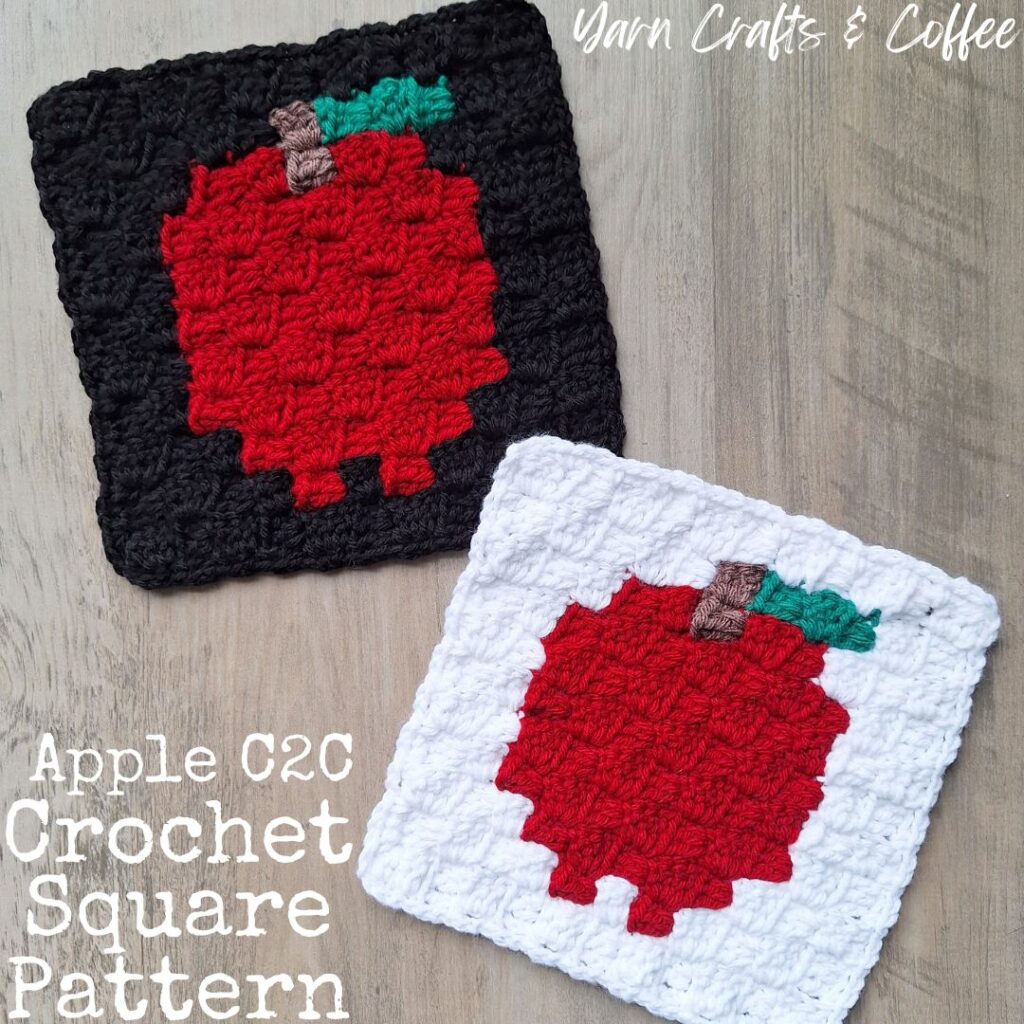
A crocheted C2C square, or corner to corner square, with an apple on it is such a fun way to add a touch of cozy Fall to your home, decorate in a farm themed kids room or nursery or gift to your favorite teacher, especially when you think of the huge variety of ways to use a C2C square.
On it’s own, you can add a dowel to the top to create a wall hanging, attach the square to a canvas to make wall art, or use the square as a washcloth or trivet. This is an excellent way to bust through your stash too!
When you make several squares and sew them together, you can create a huge range of projects, such as a purse or tote bag, wearables like an oversized scarf, a rectangle shawl, a poncho or a sweater, and home decor pieces like a table runner, throw pillow or blanket.
I may have designed my square using worsted weight yarn, but imagine the other possibilities simply by changing up the weight of yarn. My wheels are already turning.
This square is featured in my An Apple a Day Crafting Event 2026 hosted on my Yarn Crafts & Coffee blog with my friends Emily of Crochet Aweigh and Candace of T&C Crafters.
Ad-Free Printer Friendly PDF:

Yarn Crafts & Coffee newsletter subscribers get access to Exclusive Subscriber Content, like the free PDF of this pattern via the Free File Library. The library is password protected so sign up for my newsletter and you’ll receive a Welcome email containing this month’s password, or if you are already a blog subscriber, reference your latest newsletter for this month’s password. From the library, you’ll be able to access the PDFs via Google Drive – you do not need to have a Google Drive account to view and download the PDF.
Through 08/08/26 at 11:59pm EST, you can grab a free copy of the PDF for the C2C Apple Square in DC Boxes on Ravelry using code DELICIOUS26. I earn my income from the number of pageviews my blog sees, so please do not share the code, but instead share the link to this post so others can find it. Thank you!
After or for non-subscribers, if you would like a PDF version of this post, you may get one through either my Etsy Shop or Ravelry Shop for a small fee. This fee is to compensate for the views lost when you no longer need to return to the blog to for the information, as you will have your own copy.
Save this to Your Favorites On: AllFreeCrochet, FaveCrafts, Crochet Pattern Bonanza, AllFreeHolidayCrafts, DIYideaCenter, Cheap Thrifty Living
Materials:
- 95 Yards or 41 grams of Worsted Weight #4 Yarn in Total — that’s about 50 yards (22 grams) of the Background color, 21 yards (9 grams) of the color for the Apple, and less than 12 yards (5 grams) each of the Brown and Green colors for the leaf and stem
- H8/5mm Crochet Hook
- Tapestry Needle
- Scissors
- Tape Measure, if gauge is essential to your project
Yarn Talk:
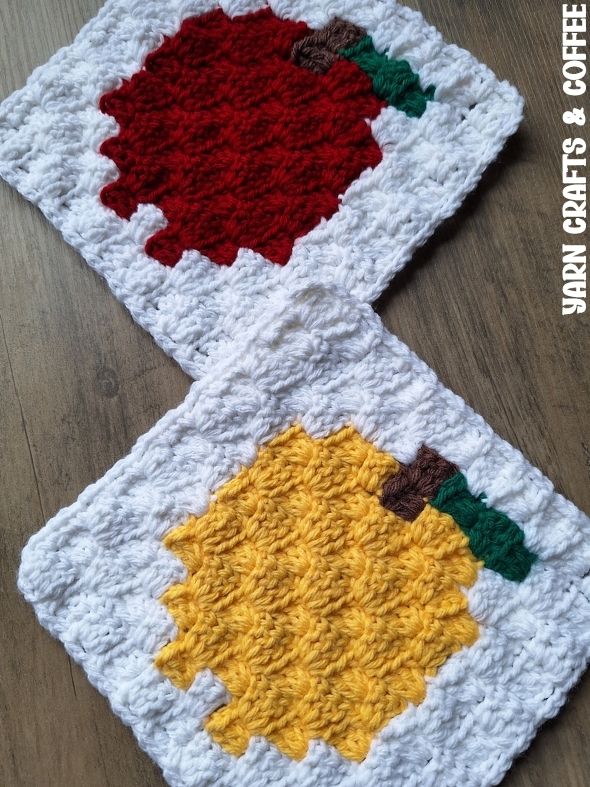
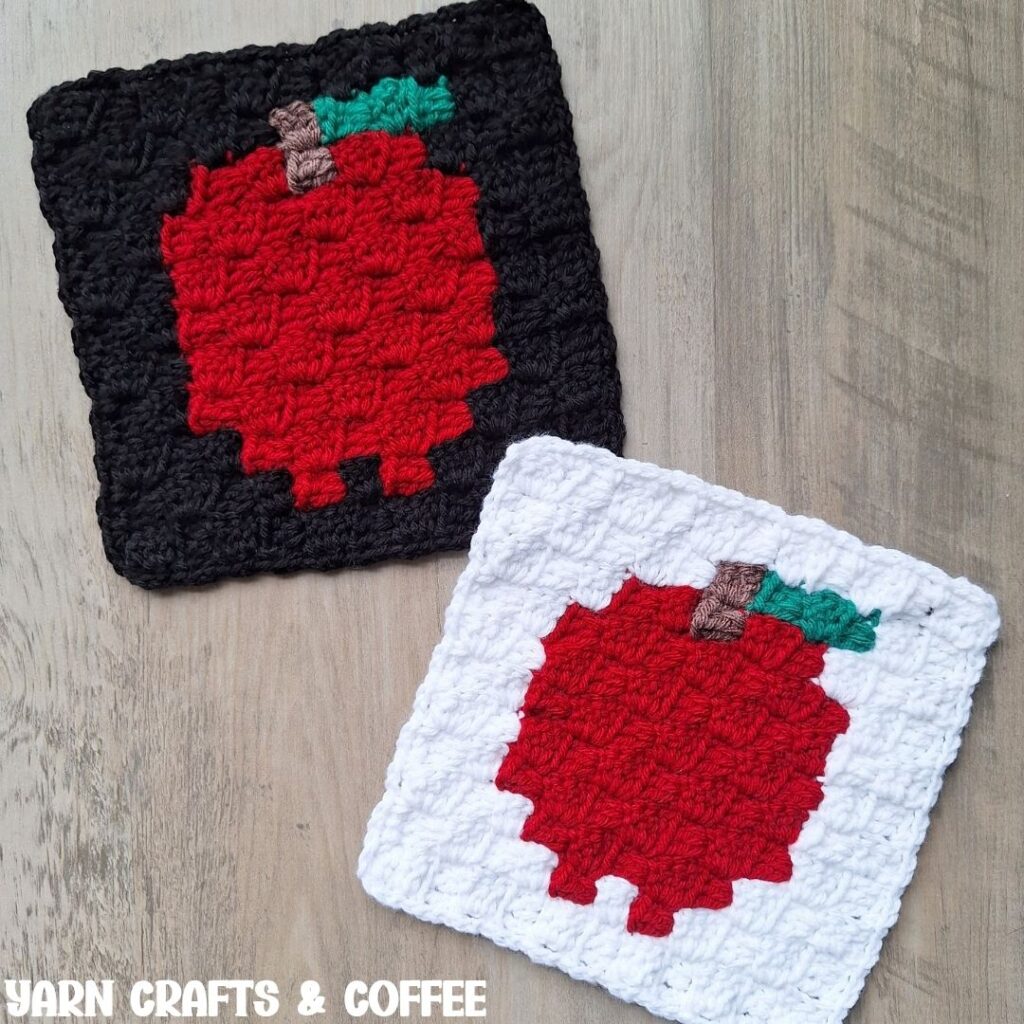
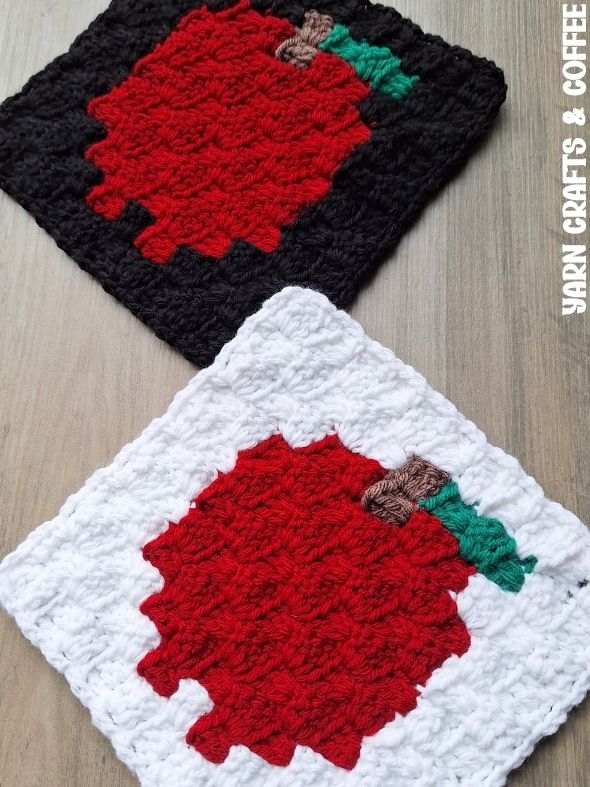
I made 3 squares using Lion Brand Pound of Love. I used the same Mocha and Wintergreen colorways for the stem and leaf, and then for the background, I made 2 with White and 1 with Black. The apples were done in Cherry and Sunflower.
Lion Brand Pound of Love Yarn is a soft, acrylic worsted weight yarn that comes in a one pound ball. One pound means you won’t need many skeins to get projects done! Just one ball makes a baby blanket, or 2-3 scarves or shawls, or lots of beanies or what feels like an infinite amount of appliques and plastic canvas projects! You’ll also love that this yarn is machine washable and dryable, making projects so easy to care for! One ball contains 1,020 yards or 454 grams.
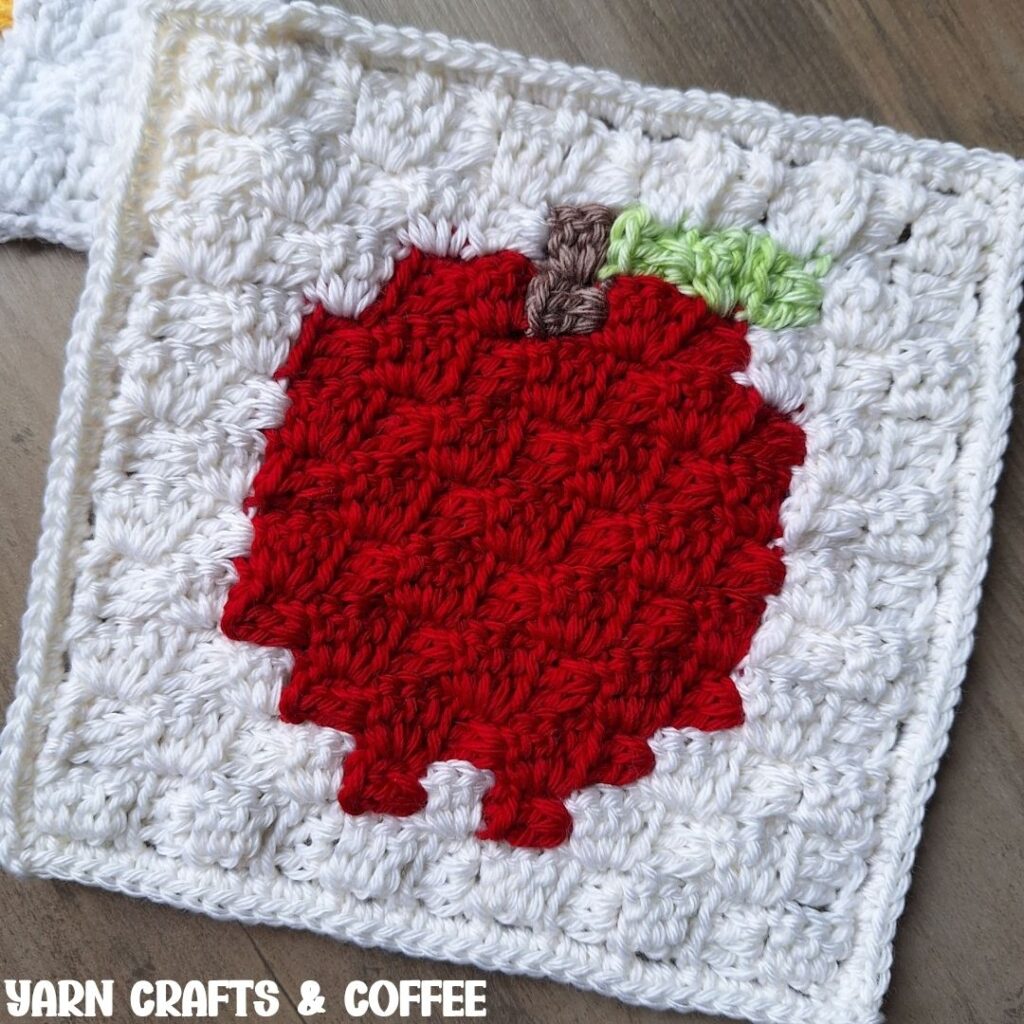
I also made a square with a Red apple using Cascade Yarns Pacific in the White, Ruby and Latte colorways as well as Cascade Yarns Pacific Prints in the Summer colorway.
Cascade Pacific Yarn is a soft, worsted weight #4 yarn comprised of 60% acrylic and 40% superwash merino wool. This soft, plushy yarn has a pretty sheen to it and feels similar to Lion Brand Pound of Love, though the strands are spun slightly looser, so frogging crocheted projects makes this yarn splitty. It’s machine washable and dryable making projects easy to care for. As of July 24th, it is available in an amazing number of colors – 85 solid colors and 17 variegated colors in the Prints line. It also comes in a Sport Weight #2, Chunky Weight #5 and Bulky Weight #6.
There is a lot of flexibility when it comes to choosing a yarn for a crocheted square, mostly guided by how you will use it, and I’ll give some examples:
On it’s own, there are lots of great ways to use a crocheted square:
- You can add a dowel to the top to create a wall hanging or attach the square to a canvas to make wall art, and with these projects, you can use any fiber that you like.
- If you wanted to use the square as a washcloth, you’ll want to grab a 100% cotton, or a blend of cotton, linen and/or bamboo.
- To use the square as a trivet, definitely reach for either a 100% cotton or 100% wool to protect your surface.
- The holes on this square are too loose to use as a hot pad without adding layers.
When you make several squares and sew them together, you can create a huge range of projects:
- To use the squares to make a purse or tote bag, 100% cotton is my go-to as it’s the most durable. I like to make mine to fit a pre-made canvas tote bag so I can use the canvas bag as a lining without having to sew my own. If you do not line your bag, it will stretch regardless of the yarn you choose.
- To crochet the squares into a wearable, like an oversized scarf, a rectangle shawl, a poncho or a sweater, I love cotton blends, like Berroco Modern Cotton or Lion Coboo for warmer weather, and wool blends, like Lion Brand Wool Ease and Berroco Vintage, for cooler weather. Acrylic yarns also work well. Keep in mind the more of an animal fiber, the warmer the wearable will be.
- To sew the squares into a home decor piece, like a table runner or blanket, there is a lot of flexibility. For a table runner, my preferred fiber is 100% cotton, but as long as you don’t put anything fresh from the oven directly on top of it, an acrylic blend, like Lion Brand Made with Love The Cottony One, a 100% acrylic yarn or really anything from your stash work well. For a blanket, I lean into cozier and warmer wool blends, like Lion Brand Wool Ease and Berroco Vintage, unless I’m making a lovey, then I like to go with a 100% cotton that is colorfast, since baby will most likely be chewing on it.
If you don’t have any worsted weight yarn, you can hold two strands of lightweight yarn together to equal the same thickness, or you can use just one strand of any weight yarn with the respective sized crochet hook to work up a smaller or larger square.
Tools & Notions:
We have lots of great crochet hooks in our Yarn Crafts and Coffee Yarn Shop. The most popular, and preferred by Candace and Emily, are the Clover Amour Crochet Hooks with the soft handles and smooth metal hook. Alexandra prefers metal crochet hooks with large, ergonomic clay handles and just loves the fun designs from SiennasBowtique and BronzeShepherdStudio! If your preference is wood, the LYKKE brand are lovely, smooth and sturdy.
Tapestry Needles with the blunt, round end are essential for sewing and finishing in crocheting and knitting. The blunt, rounded end allows the needle to pass easily through the fabric created by yarn without snagging (or getting your fingers) in the process. Aside from the more common Straight Tapestry Needle, a Bent Tip Tapestry Needle makes weaving, grafting and sewing so much easier on the hands. The long oval eye makes threading strands of yarn easier, though you may still want to use a needle threader.
Scissors are an essential tool. When I’m working on the go, I like to carry a pair of folding scissors as they fit perfectly in even the tiniest of bags. When I am working at home or have more space in my bag for a larger notions pouch, I like to use a pair of lightweight, all-purpose scissors as they are so versatile and great for a variety of things from cutting plastic canvas mesh to cutting yarn strands and trimming yarn ends after weaving in to cutting out a care tag to include with a handmade gift.
Time Spent:
Just over an hour for a square with one round on the border, and just under an hour, 15 minutes for a square with two rounds for the border.
Measurements:
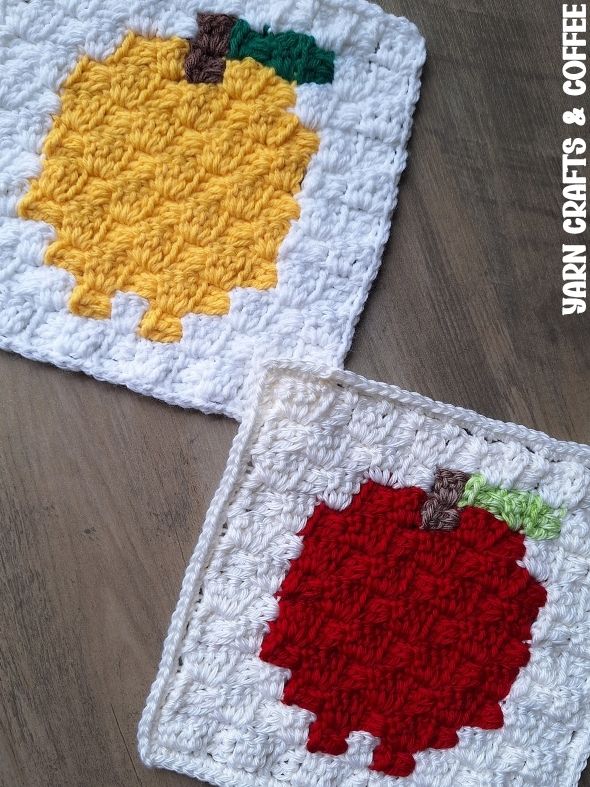
- Pound of Love, 1 Round of Border: 8″ Square
- Pacific, 1 Round of Border: 7 3/4″ wide by 7 1/2″ tall
- Pacific, 2 Rounds of Border: 8 1/4″ wide by 8 1/8″ tall
Gauge – Measured in Pattern After Row 5:
- Pound of Love: 3 3/4″ wide by 3 5/8″ tall
- Pacific: 3 5/8″ wide by 3 3/8″ tall
Don’t measure from the very corner where the tail is, since it comes in, but from where the fabric evens out.
Matching my gauge is only essential if you want your square to equal the same exact size as mine. If you plan on combining different yarns in your project, check gauge against yourself so you will know if you need to switch to a smaller or larger crochet hook when switching yarns, as some are slightly larger or smaller, even if they are the same weight.
Abbreviations (US Terms):
- SC – Single Crochet (Photo Tutorial)
- DC – Double Crochet (Photo Tutorial)
Pattern Notes:
This square grows from the bottom right corner to the top left corner.
A box is comprised of four double crochets. The beginning chain 2 counts as one of those double crochets as does the skipped chains when beginning with a chain 6.
I am going to provide two versions of this pattern: a simplified version that just has the color and number of boxes so you can easily read each row and work the color changes as desired, and a detailed version that outlines exactly how I change yarn colors as I go to get the most seamless changes, which involves multiple ways.
A colored graph is provided within the PDF of this pattern, which you can purchase from my Etsy Shop or Ravelry Shop, or subscribe to my newsletter and download it for free via the Free File Library. Head up to the PDF section of this post for all of the links.
You can absolutely work all of the color changes in the final yarn over of the previous stitch, I have a photo tutorial showing How to Change Yarn Colors in Crochet if you would like a refresher, but the changes won’t be quite as clean.
Row 1 is considered the Wrong Side, aka the back, and Row 2 is the Right Side, aka the front. Use this as a guide to drop all of the tail ends to the back side of the fabric. This not only makes it easier later on when you’re getting ready to weave in the ends, but it also makes for cleaner color changes.
Some of the color changes result in a small float along the back of a box, but the colors match each other so you don’t notice the floats. Just note that while the floats are flat against the fabric, they are long enough to get caught on rings and are large enough for little fingers to get under them and pull so depending on how you will use your square, you may opt to fasten off and reattach your strands instead or line the back of the fabric.
Because there are so many fun color variations, not just for the background, but also for different kinds of apples, I am going to write my pattern out using Background to represent the background color, Apple to represent the color of the apple you’re making, Green to represent the leaf color and Brown to represent the stem color.
For the Background [color], I worked from the two ends of my yarn ball. To help manage your strands easier or if you prefer working from the same direction of the yarn ball (like from the center), you can use two different balls of the same color. This doesn’t mean you need to purchase two balls of the color, you can separate one ball into two and either hand wind it into a ball or use a winder. You may also opt for bobbins instead, especially when it comes to the green and brown.
When it comes to bobbins, I pull a really long tail from one end of my yarn, fasten off and use it until I ran out, then add a new strand when needed following the same manner. Working this way will produce more ends to weave in in the end, but it’s a bit easier to manage. I am a rebel and I let the strands hang loose, which do tangle, so to avoid tangling while you work, create butterfly bobbins with your yarn strands, and take time to untangle the yarn as you turn with each row.
Simplified C2C Apple Square Crochet Pattern:
R1: 1 Background. (1 Box)
R2 – 5: Increase Up to 5 Boxes.
Gauge Check if desired: 3 3/4″ wide by 3 5/8″ tall.
R6: 2 Background, 3 Apple, 1 Background. (6 Boxes)
R7: 2 Background, 3 Apple, 2 Background. (7 Boxes)
R8: 2 Background, 5 Apple, 1 Background. (8 Boxes)
R9: 2 Background, 5 Apple, 2 Background. (9 Boxes)
R10: 2 Background, 6 Apple, 2 Background. (10 Boxes)
R11: 3 Background, 5 Apple, 3 Background. (11 Boxes)
No More Increases. Begin Decreasing.
R12: 1 Background, 1 Green, 6 Apple, 2 Background. (10 Boxes)
R13: 2 Background, 5 Apple, 1 Green, 1 Background. (9 Boxes)
R14: 1 Background, 1 Green, 1 Brown, 3 Apple, 2 Background. (8 Boxes)
R15: 2 Background, 3 Apple, 1 Brown, 1 Background. (7 Boxes)
R16: 2 Background, 2 Apple, 2 Background. (6 Boxes)
R17: 5 Background. (5 Boxes)
R18 – 21: Continue Decreasing Down to 1 Box.
Border:
Continuing in your Background color, chain 1 (does not count as a stitch) and turn. SC into the space in between the boxes of Row 21 and Row 20, chain 2, SC into the corner stitch, chain 2, [(SC into the space in between the next 2 boxes, chain 2) 10x, SC into the corner stitch, chain 2] 3x, (SC into the space in between the next 2 boxes, chain 2) 9x. Slip stitch join to the first SC.
At this point, if you’d like to make the square bigger, you can add additional rounds to the border. I’ll provide instructions for continuing to work in single crochets, but you can easily change that up if desired. When you get to the corner SC, work a (SC, chain 2, SC) as written for a more square corner or a (SC, chain 1, SC) for a more round corner. Any additional rounds will be worked as normal in the round as you’ll now have a solid foundation all the way around.
R2: Chain 1, but don’t turn. SC into the 1st SC, 2 SC into the next chain space, (SC, chain 2, SC) into the corner SC, 2 SC into the next chain space, (SC into the next SC, 2 SC into the next chain space) 10x, (SC, chain 2, SC) into the corner SC] 3x. 2 SC into the next chain space, (SC into the next SC, 2 SC into the next chain space) 9x. Join.
Fasten off. If any of the tail ends made their way to the front of the fabric, use your crochet hook to pull them to the back of the fabric. Weave in all of the tail ends.
C2C Apple Square Crochet Pattern with Detailed Color Changes:
R1: In the Background color, chain 6. DC into the 4th chain, and into each of the next 2. (1 Box).
R2: Chain 6, and turn. DC into the 4th, 5th and 6th chains. You now have an alligator mouth shape. Flip the bottom fabric so it’s mirrored and slip stitch into the top of the next chain 2, which is the stitch that is the most natural to work into when you lay your 2 boxes together. Chain 2. Looking at the next box, you see the stitches laying horizontally. Work 2 DC into the space in between the top 2 stitches. To help keep a straight edge, work the last DC into the foundation chain on the left side. (2 Boxes)
R3: (I) Chain 6, and turn. DC into the 4th chain, and into each of the next 2. Flip your fabric and slip stitch into the top of the next chain 2; (II) Chain 2, work 3 DC into the space in between the top 2 stitches of the same box, slip stitch into the top of the next chain; (III) Chain 2, work 2 DC into the space in between the top 2 stitches of the same box, DC into the foundation chain on the left side. (3 Boxes)
R4 – 5: Using Row 3 as a base, you will continue working in the same manner repeating (II) one extra time each row to increase the number of boxes by one each row. Each of these rows will have the same number of boxes as row (ie 4 will have 4 boxes, 5 will have 5 boxes).
In Row 6, we’ll begin with the colorwork to create the apple. Continue in the same manner as Row 3 to work the actual boxes, but to simplify the pattern, the written rows will only have box colors, until we get ready to decrease.
Gauge Check if desired: 3 3/4″ wide by 3 5/8″ tall.
R6: 2 Background | Color Change A: 3 Apple | Color Change B: 1 Background. (6 Boxes)
Color Change A (when you need to add a new strand from the ball): complete the previous box as normal with 4 stitches and join it. Grab the new yarn strand. Form a loop near the end, leaving a tail end long enough you can comfortably weave it in. Put the loop onto your crochet hook and pull it through to switch to it. With the new color, chain 2. Go back to the strand of the color you just switched from and give it a tug so the loop disappears.
Color Change B (when you need to add a new strand from the ball): complete the previous box as normal with 4 stitches, but don’t join it yet. Insert your crochet hook into the next stitch as if to slip stitch, then grab the new yarn strand. Form a loop near the end, leaving a tail end long enough you can comfortably weave it in. Put the loop onto your crochet hook and pull it all the way through to switch to it. With the new color, chain 2. Go back to the strand of the color you just switched from and give it a tug so the loop disappears.
I change colors like this because if you do it like B for A, you get a small Apple dash across the top of the Background box that’s out of place, and if you do it like A for B, you get the top of the last Apple stitch that leans into the last Background box.
R7: 2 Background | 3 Apple | 2 Background. (7 Boxes)
Color Change C for both: complete the previous box as normal with 4 stitches, but don’t join yet. Drop the tail end to the side you’re currently looking at, which has all of the other tails there too. Grab the strand you’re switching to and tighten it up, then pull it up along the fabric just to the right of the stitch you’ll work into next. Insert your hook into the next stitch to join, keeping the working yarn on the inside. Yarn over with the new color and pull through both loops. Chain 2 with the new color, then go back to the color you just switched from and tighten it down so the loop disappears.
R8: 2 Background | 5 Apple ** | 1 Background. (8 Boxes)
Color Change E for both: complete the previous box as normal with 4 stitches, but don’t join yet. Insert your hook into the next stitch as if to join. Drop the current color to the back. Grab the color you’re switching to, tighten it up and then yarn over as normal and pull it all the way through to complete a slip stitch. Chain 2 with the new color., then go back to the strand of the color you just switched from and give it a tug so the loop disappears.
This is a traditional color change done in the last yarn over of the previous stitch, with the addition of tugging on the strand after so the loop disappears.
**When you go to join the 4th Apple box, you will notice the Background strand is there. You will either need to fasten off the Background strand and reattach it to work the last box, or you will need to carry it up.
To carry up the Background strand: after complete the 4 stitches from the 4th Apple box, insert the crochet hook as if to slip stitch, then reach down and grab the Background strand, tighten it up (carefully so you don’t bunch up the fabric) and yarn over with it, just so it sits on your crochet hook. Yarn over with the current color and pull it all the way through to complete the slip stitch. Chain 2 to lock the Background strand in place and then work the next 3 stitches of the 5th Apple box holding the Background strand against the back of the fabric so you can crochet over top of it as you work this box. After completing the 4th stitch, work a Color Change E.
*Note: You will have a small float after working this color change, but the colors will blend in so it won’t be noticeable.
R9: 2 Background | 5 Apple | 2 Background. (9 Boxes)
Color Change C for both: complete the previous box as normal with 4 stitches, but don’t join yet. Drop the tail end to the side you’re currently looking at, which has all of the other tails there too. Grab the strand you’re switching to and tighten it up, then pull it up along the fabric just to the right of the stitch you’ll work into next. Insert your hook into the next stitch to join, keeping the working yarn on the inside. Yarn over with the new color and pull through both loops. Chain 2 with the new color, then go back to the color you just switched from and tighten it down so the loop disappears.
R10: 2 Background | Color Change D: 6 Apple | Color Change E: 2 Background. (10 Boxes)
Color Change D: complete the previous box as normal with 4 stitches, but don’t join yet. Insert your hook into the next stitch as if to join. Keep the strand of the current color in your working hand as we’ll need it to finish the stitch, but reach down to the strand you’ll be switching to and tighten it up, then yarn over clockwise with it (which is different than normal) just so it sits on your crochet hook when you work the join and hold tension on the back. Yarn over with the current color and pull it all the way through to complete a slip stitch. Drop the strand of the color you’re switching from to the back of the fabric. Pick up the new color, yarn over with it and pull it through, then chain 2. Go back to the strand of the color you just switched from and give it a tug so the loop disappears.
Color Change E: complete the previous box as normal with 4 stitches, but don’t join yet. Insert your hook into the next stitch as if to join. Drop the current color to the back. Grab the color you’re switching to, tighten it up and then yarn over as normal and pull it all the way through to complete a slip stitch. Chain 2 with the new color., then go back to the strand of the color you just switched from and give it a tug so the loop disappears.
This is a traditional color change done in the last yarn over of the previous stitch, with the addition of tugging on the strand after so the loop disappears.
*Note: You will have a small float after working this color change, but the colors will blend in so it won’t be noticeable.
I change colors like this because if you do it like E for D, you get a small Apple dash across the top of the Background box that’s out of place, and if you do it like D for E, you get the top of the last Apple stitch that leans into the last Background box.
R11: 3 Background | Color Change C: 5 Apple | Color Change F: 3 Background. (11 Boxes)
Color Change C (when you will pull the strand up): complete the previous box as normal with 4 stitches, but don’t join yet. Drop the tail end to the side you’re currently looking at, which has all of the other tails there too. Grab the strand you’re switching to and tighten it up, then pull it up along the fabric just to the right of the stitch you’ll work into next. Insert your hook into the next stitch to join, keeping the working yarn on the inside. Yarn over with the new color and pull through both loops. Chain 2 with the new color, then go back to the color you just switched from and tighten it down so the loop disappears.
Color Change F (when you will pull the strand over): complete the previous box as normal with 4 stitches, but don’t join yet. Drop the current color to the side you’re currently looking at. Grab the color you’re switching to and tighten it up, then insert your hook into the next stitch as if to join. Yarn over with the new color and pull it all the way through to complete a slip stitch. Chain 2 with the new color., then go back to the strand of the color you just switched from and give it a tug so the loop disappears.
Begin Decreasing
Now the square is as wide and tall as we want it to be so there is no more increasing, meaning we no longer will begin with a chain 6.
In fact, we’re going to start decreasing so each remaining row will decrease by 1 box and begin as: chain 1 and turn. Slip stitch into the 2nd, 3rd and 4th stitches. Chain 2, work 3 DC into the space in between the top 2 stitches of the same box. Slip stitch into the top of the next chain.
Once you reach the end of the row, you will finish even with the last box, rather than working an additional box on top. You should start to see your overall square take shape.
R12: 1 Background | Color Change B: 1 Green | * Color Change E: 6 Apple | ** Color Change E: 2 Background. (10 Boxes)
Color Change B (when you need to add a new strand from the ball): complete the previous box as normal with 4 stitches, but don’t join it yet. Insert your crochet hook into the next stitch as if to slip stitch, then grab the new yarn strand. Form a loop near the end, leaving a tail end long enough you can comfortably weave it in. Put the loop onto your crochet hook and pull it all the way through to switch to it. With the new color, chain 2. Go back to the strand of the color you just switched from and give it a tug so the loop disappears.
Color Change E: complete the previous box as normal with 4 stitches, but don’t join yet. Insert your hook into the next stitch as if to join. Drop the current color to the back. Grab the color you’re switching to, tighten it up and then yarn over as normal and pull it all the way through to complete a slip stitch. Chain 2 with the new color., then go back to the strand of the color you just switched from and give it a tug so the loop disappears.
*Note: You will have a small dot of Apple popping through in the corner where the corner change is done. You can manipulate the stitches from the Green box to fluff and cover that dot, or you can use the tail end from when you added the Green to sew over and cover the Apple dot.
**Note: You will have a small float after working this color change, but the colors will blend in so it won’t be noticeable.
R13: 2 Background | Color Change C: 5 Apple | Color Change F: 1 Green | Color Change F: 1 Background. (9 Boxes)
Color Change C (when you will pull the strand up): complete the previous box as normal with 4 stitches, but don’t join yet. Drop the tail end to the side you’re currently looking at, which has all of the other tails there too. Grab the strand you’re switching to and tighten it up, then pull it up along the fabric just to the right of the stitch you’ll work into next. Insert your hook into the next stitch to join, keeping the working yarn on the inside. Yarn over with the new color and pull through both loops. Chain 2 with the new color, then go back to the color you just switched from and tighten it down so the loop disappears.
Color Change F (when you will pull the strand over): complete the previous box as normal with 4 stitches, but don’t join yet. Drop the current color to the side you’re currently looking at. Grab the color you’re switching to and tighten it up, then insert your hook into the next stitch as if to join. Yarn over with the new color and pull it all the way through to complete a slip stitch. Chain 2 with the new color., then go back to the strand of the color you just switched from and give it a tug so the loop disappears.
R14: 1 Background | Color Change E: 1 Green | ** Color Change B: 1 Brown | Color Change E: 3 Apple | Color Change E: 2 Background. (8 Boxes)
Color Change E: complete the previous box as normal with 4 stitches, but don’t join yet. Insert your hook into the next stitch as if to join. Drop the current color to the back. Grab the color you’re switching to, tighten it up and then yarn over as normal and pull it all the way through to complete a slip stitch. Chain 2 with the new color., then go back to the strand of the color you just switched from and give it a tug so the loop disappears.
This is a traditional color change done in the last yarn over of the previous stitch, with the addition of tugging on the strand after so the loop disappears.
*Note: You will have a small float after working the color change from Background to Green and from Green to Brown if carrying the Apple , but the colors will blend in so it won’t be noticeable.
**As you are preparing to switch from Green to Brown, you will notice the Apple strand is there. You will either need to fasten off the Apple strand and reattach it to work the box after Brown, or you will need to carry it up.
To carry up the Apple strand: after complete the 4 stitches from the Green box, insert the crochet hook as if to slip stitch, then reach down and grab the Apple strand, tighten it up and yarn over with it, just so it sits on your crochet hook. Proceed with Color Change B to add the Brown strand. The chain 2 to begin the box will secure the Apple strand in place.
Color Change B (when you need to add a new strand from the ball): you already have your hook inserted as instructed in the carry instructions. Grab the new yarn strand. Form a loop near the end, leaving a tail end long enough you can comfortably weave it in. Put the loop onto your crochet hook and pull it all the way through to switch to it. With the new color, chain 2. Go back to the strand of the color you just switched from and give it a tug so the loop disappears.
Work the 3 stitches of the Brown box holding the Apple strand against the back of the fabric so you can crochet over top of it as you work this box. After completing the 4th stitch, work a Color Change E, tightening the Apple carefully so you don’t bunch up the fabric.
Fasten off the Green.
R15: 2 Background | Color Change C: 3 Apple | Color Change C: 1 Brown | Color Change F: 1 Background. (7 Boxes)
Color Change C (when you will pull the strand up): complete the previous box as normal with 4 stitches, but don’t join yet. Drop the tail end to the side you’re currently looking at, which has all of the other tails there too. Grab the strand you’re switching to and tighten it up, then pull it up along the fabric just to the right of the stitch you’ll work into next. Insert your hook into the next stitch to join, keeping the working yarn on the inside. Yarn over with the new color and pull through both loops. Chain 2 with the new color, then go back to the color you just switched from and tighten it down so the loop disappears.
Color Change F (when you will pull the strand over): complete the previous box as normal with 4 stitches, but don’t join yet. Drop the current color to the side you’re currently looking at. Grab the color you’re switching to and tighten it up, then insert your hook into the next stitch as if to join. Yarn over with the new color and pull it all the way through to complete a slip stitch. Chain 2 with the new color., then go back to the strand of the color you just switched from and give it a tug so the loop disappears.
Fasten off the Brown.
R16: 2 Background | Color Change E: 2 Apple | Color Change D: 2 Background. (6 Boxes)
Color Change E: complete the previous box as normal with 4 stitches, but don’t join yet. Insert your hook into the next stitch as if to join. Drop the current color to the back. Grab the color you’re switching to, tighten it up and then yarn over as normal and pull it all the way through to complete a slip stitch. Chain 2 with the new color., then go back to the strand of the color you just switched from and give it a tug so the loop disappears.
This is a traditional color change done in the last yarn over of the previous stitch, with the addition of tugging on the strand after so the loop disappears.
Color Change D: complete the previous box as normal with 4 stitches, but don’t join yet. Insert your hook into the next stitch as if to join. Keep the strand of the current color in your working hand as we’ll need it to finish the stitch, but reach down to the strand you’ll be switching to and tighten it up, then yarn over clockwise with it (which is different than normal) just so it sits on your crochet hook when you work the join and hold tension on the back. Yarn over with the current color and pull it all the way through to complete a slip stitch. Drop the strand of the color you’re switching from to the back of the fabric. Pick up the new color, yarn over with it and pull it through, then chain 2. Go back to the strand of the color you just switched from and give it a tug so the loop disappears.
Fasten off the first Background strand and the Apple.
R17: 5 Background. (5 Boxes)
R18 – 21: Continue Decreasing Down to 1 Box.
Border:
Continuing on with your Background color, chain 1 (does not count as a stitch) and turn. SC into the space in between the boxes of Row 21 and Row 20, chain 2, SC into the corner stitch, chain 2, [(SC into the space in between the next 2 boxes, chain 2) 10x, SC into the corner stitch, chain 2] 3x, (SC into the space in between the next 2 boxes, chain 2) 9x. Slip stitch join to the first SC.
At this point, if you’d like to make the square bigger, you can add additional rounds to the border. I’ll provide instructions for continuing to work in single crochets, but you can easily change that up if desired. When you get to the corner SC, work a (SC, chain 2, SC) as written for a more square corner or a (SC, chain 1, SC) for a more round corner. Any additional rounds will be worked as normal in the round as you’ll now have a solid foundation all the way around.
R2: Chain 1, but don’t turn. SC into the 1st SC, 2 SC into the next chain space, (SC, chain 2, SC) into the corner SC, 2 SC into the next chain space, (SC into the next SC, 2 SC into the next chain space) 10x, (SC, chain 2, SC) into the corner SC] 3x. 2 SC into the next chain space, (SC into the next SC, 2 SC into the next chain space) 9x. Join.
Fasten off. If any of the tail ends made their way to the front of the fabric, use your crochet hook to pull them to the back of the fabric. Weave in all of the tail ends.
Please feel free to make and sell your own items made using this pattern, but keep in mind, this written pattern and my photos are protected by copyright. Please DO NOT claim this pattern as your own nor should you sell my pattern. DO NOT re-publish my photos as your own. DO NOT copy and paste my pattern anywhere, link to it instead so other’s can visit. Making videos providing instructions how to make my projects on any social media platform is also not permitted.
Would love to have you join our Yarn Crafts & Coffee Community group on Facebook to share your creations, and see what others are up to

So cute! and corner to corner is so fun for color work!